ArcGIS and Power BI

ArcGIS and Power BI
By Jake Hanson - GIS Advisor
Accessing ArcGIS feature layer attribute data in Power BI using a Custom Data Connector
Many organisations use ArcGIS for geospatial analytics, visualisation, and data capture, alongside Power BI Desktop, which creates interactive reports and dashboards from a variety of data sources. However, ensuring that users across both platforms work with consistent data and provide uniform reporting to stakeholders can be a significant challenge.
This post describes how you can compile and configure a Power BI Custom Data Connector to simplify the process of using up-to-date ArcGIS data in your Power BI reports.
What is a Custom Data Connector?
Power BI comes with many data connectors out-of-the-box, for example, allowing you to connect to an Excel Spreadsheet, Parquet, or a SQL Server table.
However, Microsoft also allows you to build your own data connector if your data is in a format that is not natively supported. As there is no native connector for ArcGIS, this post will show you how you can build your own that handles authenticating with ArcGIS, querying a feature layer, paging through the results and loading them into a report.
When should I use the custom data connector rather than other workflows?
There are several other documented workflows for bringing your ArcGIS data into Power BI, and each has its own advantages and disadvantages, briefly outlined in the table below:
|
Workflow |
Great for |
Limitations |
|
Using ArcGIS Maps for Power BI to visualise your ArcGIS data within Power BI Desktop |
|
|
|
Automating data export to CSV using Power Automate or in bulk with FME or Python |
|
|
|
Directly querying a feature layer using a Web Connection within Power BI Desktop
|
|
|
|
Using a Power BI Custom Data Connector |
|
|
How would I build a custom data connector?
Fortunately, most of the work has already been done for you. This GitHub repository contains the basic code for the connector. There's a little bit of work needed to configure and compile the connector for the ArcGIS Online organisation or ArcGIS Enterprise instance which contains the feature layer(s) you want to access. The steps for this are outlined below.
How do I configure and compile the connector?
1. The first step is to install Visual Studio Code, a free text editor and Integrated Development Environment (IDE) with powerful built-in tools, including tools to compile Power BI Data Connectors.
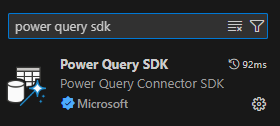
2. Follow this guide to install the Power Query SDK Extension for Visual Studio Code.
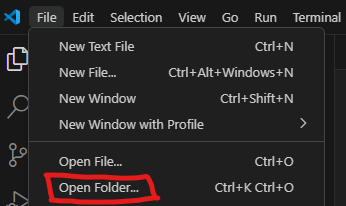
3. Download this GitHub repository by clicking on the green "Code" button and "Download as zip". Unzip the compressed folder, then open the folder in Visual Studio Code.
4. The next step is to register an App in ArcGIS Online or Portal (wherever the data is that you want to access). This will create a Client ID and Secret that will be used to allow the Data Connector to authenticate with ArcGIS.
a. Go to My Content > New Item > Application
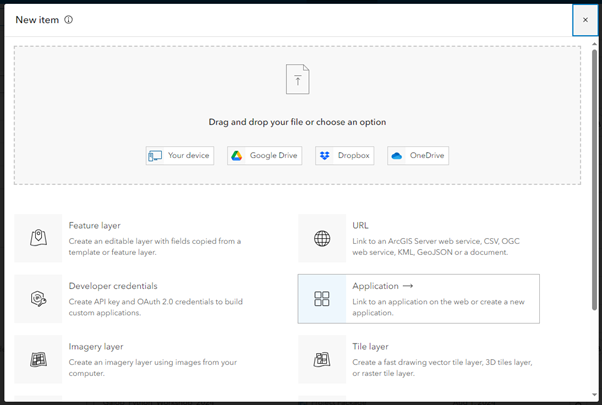
b. Create an application of type "Other application"
c. Name it Power BI Desktop.
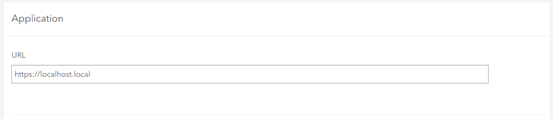
5. In the page that opens, click Settings

6. In the URL box add https://localhost.local
7. Scroll down and add https://oauth.powerbi.com/views/oauthredirect.html to the Redirect URI box.
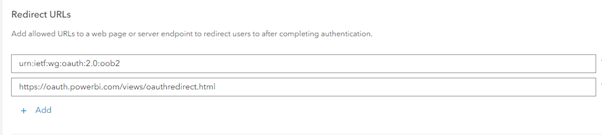
Click Add, then Save to complete the app registration process.
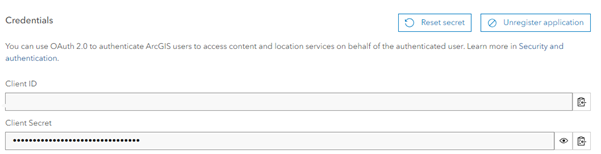
8. Scroll to the Credentials section and copy the Client ID. In Visual Studio Code, paste it (overwriting the existing text) into the client_id.config file.
9. Update the client_portal.config file in the cloned repository to your ArcGIS Online or Portal URL.
![]()
10. In the connector_name.config file, update the file to reflect the name of the environment (e.g. ArcGIS Online Feature Layer or Eagle Enterprise PROD Feature Layer) so that users know which Portal's feature layers they can connect to using this connector.
![]()
11. Now we have finished configuring the connector, we can compile it into a Power BI Connector. Press F1 and type "Build Task". Select the Tasks: Run Build Task option.
12. Select "Build project using MakePQX". This will build the Connector and store it as a .mez file in the unzipped folder's '…/bin/AnyCPU/Debug' folder.
I've compiled the connector, how do I install it?
1. Create the folder C:\Users\<user>\Documents\Power BI Desktop\Custom Connectors if it doesn't already exist.
2. Copy the .mez file from <unzipped folder>/bin/AnyCPU/Debug into the new 'Custom Connectors' folder.
NOTE: While it is possible for multiple users to use the same .mez file (i.e. an administrator could create and share a .mez file and associated Portal item with all organisation members), the client ID and secret are easily accessible in plain text in the .mez file, meaning there is a possible risk that a knowledgeable user could re-use these credentials to impersonate your application.
How do I use the connector once it is installed?
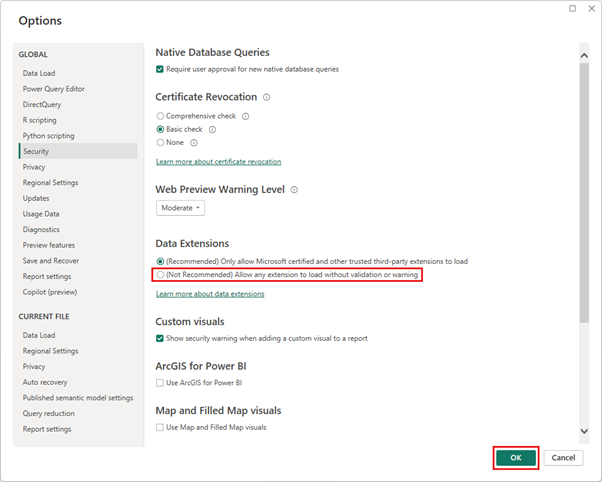
1. In Power BI, under Options and Settings > Options > Security, enable non-certified connectors. Microsoft certifies a limited subset of custom connectors, but as we are building this one on-the-fly, the connector you create will not be certified.
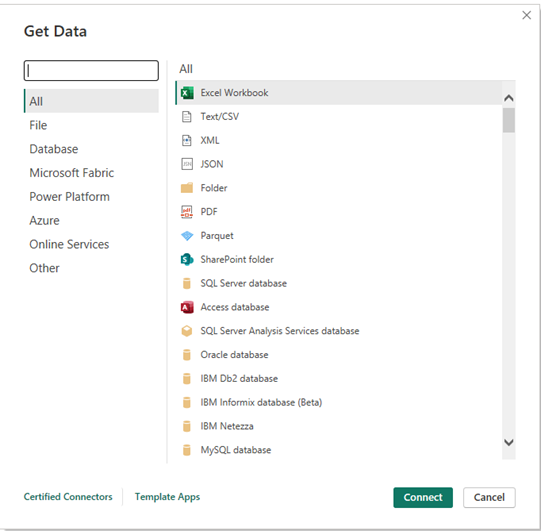
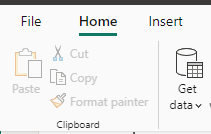
2. Now you're ready to use the connector to add ArcGIS data into Power BI. Under the Home tab in your report, click Get data, click 'More...' at the bottom of the menu, and Search for "ArcGIS". Your connector should appear in the list. Click it then click "Connect"
NOTE: If you don't see the Custom Connector in the list, it may be because the version of Power BI being used has been downloaded from the Microsoft Store. It is recommended that Power BI be downloaded directly from the official Power BI Website: https://www.microsoft.com/en-nz/power-platform/products/power-bi/desktop
3. Enter the URL for the Feature Layer you want to add to your Power BI model, ideally suffixed with a compliant query (filter) as described in the Query documentation.
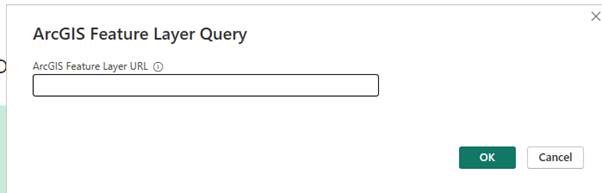
NOTE: It is highly recommended to use a query to remove any records you don't need to use in your report to reduce the load on the ArcGIS server. Example: Only the features with an OBJECTID less than 1000 will be returned. https://services.arcgis.com/hMYNkrKaydBeWRXE/ArcGIS/rest/services/Addresses_geocoded/FeatureServer/0/query?f=json&outFields="*"&where=OBJECTID<1000&returnGeometry=false
NOTE: If you provide a feature layer URL without a query, which will look like this: https://services.arcgis.com/hMYNkrKaydBeWRXE/ArcGIS/rest/services/Addresses_geocoded/FeatureServer/0/query?f=json&outFields=""*""&where=1=1&returnGeometry=false
NOTE: If you provide a feature layer URL without a query, which will look like this:
https://services.arcgis.com/hMYNkrKaydBeWRXE/ArcGIS/rest/services/Addresses_geocoded/FeatureServer/0
The default query below will be used, to request all the features: query ?f=json&outFields=""*""&where=1=1&returnGeometry=false
NOTE: The geometry is never returned by the connector.
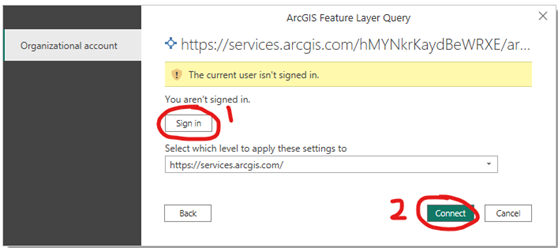
4. Click OK, then click Sign in. This will prompt you to sign in with your ArcGIS credentials. Once signed in, click Connect to load your data into your Power BI report.
Now you should see your ArcGIS data in Power BI!
When you hit the Refresh Data button, the connector should handle the authentication and pull in the latest data from ArcGIS! If you are signed out, the dialog above will display. Simply click "Sign in" again to reconnect to ArcGIS.
