Wrapping widgets in Experience Builder and publishing apps in Azure DevOps.

Wrapping widgets in Experience Builder and publishing apps in Azure DevOps.

In the first post in this series, I described how to create a custom Esri JavaScript API widget and publish that widget to npm using a CI/CD approach with Azure DevOps.
In this post, I will describe how we can wrap this widget within an Experience Builder custom widget and publish it in an Experience Builder application via Azure DevOps.
Overview
In this post we will create a repository that:
- Uses Docker to create an Experience Builder application.
- Includes a custom widget by wrapping it in an Experience Builder widget.
- Creates an automated build and deployment of the application via DevOps.
- Demonstrates a simple and fast method for bumping the Experience Builder version.
Prerequisites
To complete this you will need:
- Docker desktop installed on your machine.
- Familiarity with Experience Builder Developer Edition.
- An ArcGIS Online or ArcGIS Enterprise account you can configure Experience Builder with.
- An Azure DevOps account, and preferably an Azure App Service (you can create free ones).
1: Getting started
As stated above, you will need to have Docker installed on your machine to follow through with this workflow. If you do not have it installed, you can grab it for your particular OS below:
Next, you should create a new repository in Azure DevOps and clone this to your local machine. If you do not know how to do that, see the instructions here.
Using Docker means we do not need to have all the Experience Builder folders in our repository, we only need folders related to widget development, and if we are creating an application, the folders that relate to that.
Using a docker-compose file, we can map these folders into our Docker container, Experience Builder will pick up any code changes in our local files and compile them for use in the container.
Create a folder structure in your repository as follows.
volumes
--public
--themes
--widgets
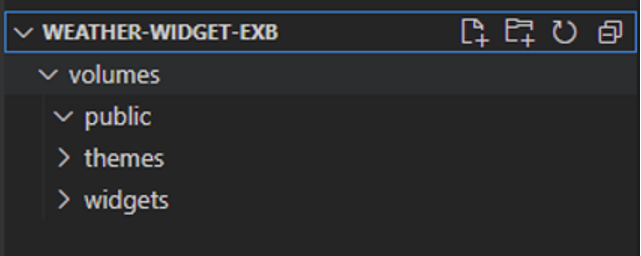
You may not necessarily need all these folders for this exercise, but this will give you a template for working with Docker and mapping volumes if you choose to do something different to the widget we are creating today.
2: Getting Docker up and running
Now we have the folder structure sorted, we need to get Docker up and running and map the folders we have just created into our container.
We also need to do a secondary step to pull some information out of our container, to make it easier for us to develop against the Experience Builder framework.
The first thing we need to do is create a docker-compose file, this is what we will use to launch our container and start-up Experience Builder. I have created a series of Experience Builder images for Docker for the different versions that are hosted on the Docker repository, feel free to use these, or if you wish to create your own, I will be creating another post that will explain the process to do this.
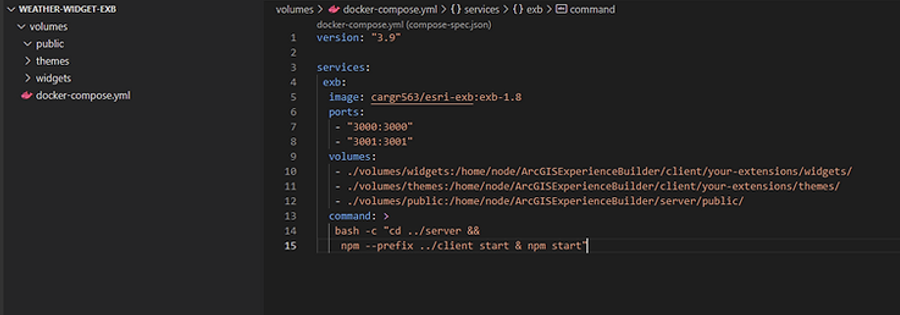
Create a file called docker-compose.yml in the root of your repository and add the following.
version: "3.9"
services:
exb:
image: cargr563/esri-exb:exb-1.8
ports:
- "3000:3000"
- "3001:3001"
volumes:
- ./volumes/widgets:/home/node/ArcGISExperienceBuilder/client/your-extensions/widgets/
- ./volumes/themes:/home/node/ArcGISExperienceBuilder/client/your-extensions/themes/
- ./volumes/public:/home/node/ArcGISExperienceBuilder/server/public/
command: >
bash -c "cd ../server &&
npm --prefix ../client start & npm start"
The yml above pulls the image from the esri-exb image, and grabs the 1.8 version, using the exb-1.8 tag.
We map the ports on the container, to our localhost, so we can run Experience Builder as if it were on our own machine.
The volumes section is where we map the folders that we have created into the container.
Finally, once the container has started, we run the command to start the Experience Builder server and start the client folder to look for changes.
To start all of this up, open a terminal window and ensure you are at the root of your repo (the same location as your docker-compose file.
Run the following command
docker compose up
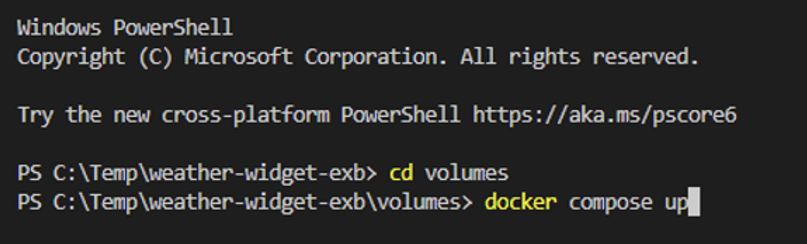
You should now see Docker pull the container, start it up, install the widget, and then run the commands to start Experience Builder.
You will also see a series of errors, as we do not have any content in our widget folder yet.
With the command running, you should now be able to access Experience Builder in your browser by going to https://localhost:3001/
You should hopefully see the following.
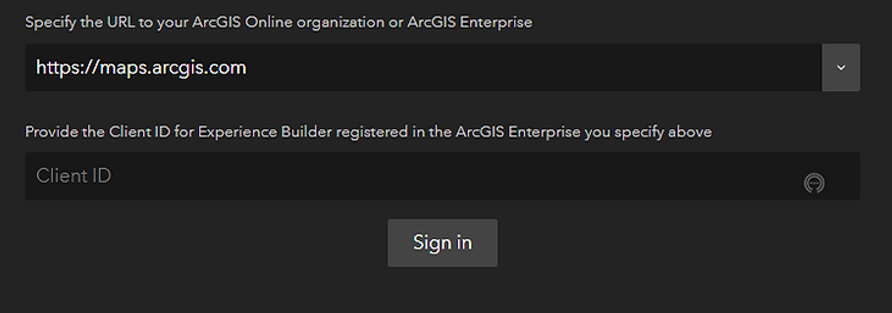
Follow the instructions here to get set up with the Developer Edition of Experience Builder to create a client id.
3: Creating the application
The next step is to wrap the custom JSAPI widget we created in the first section into an Experience Builder widget.
To do this, we will create a new folder under the /widgets folder for our widget, call it live-weather
Download the following code and copy it into your live-weather folder.
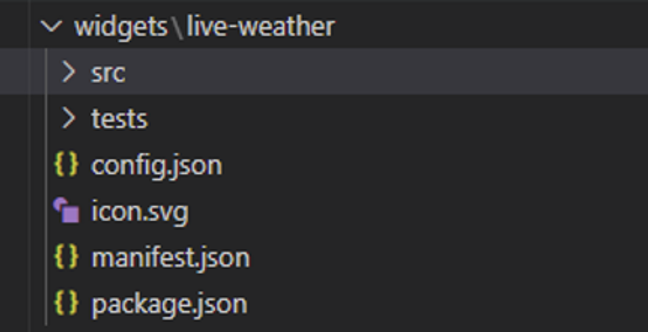
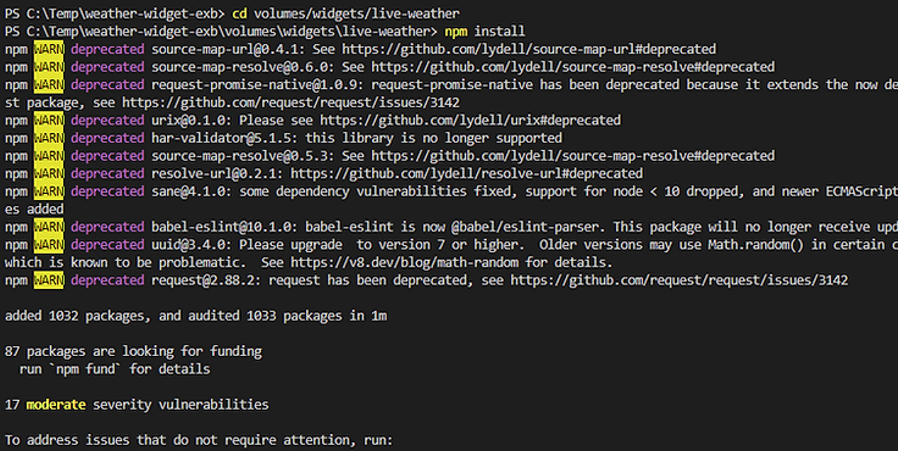
As the code above already has a package.json included, you can run npm install at the root of the live-weather folder to install the widget and dependencies.
You could also install this at the Experience Builder level as part of the docker compose. If this is required, I can provide details on how to do this, however, it is better to do it at this level as it will only be required by the widget we are creating.
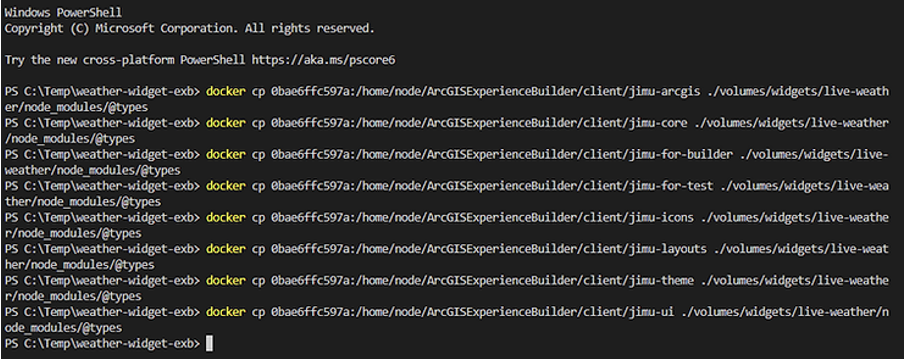
Next, we need to install the types from Experience Builder which ensures we are using the correct commands. The types are installed as part of the container, and now that we have started it (you must have started it at least once) we can copy those types out of the container to our local development machine.
Note: if you upgrade the container to a new version of Experience Builder, you will have to run the command again, to ensure you are using the correct types for the Experience Builder version.
Run the following command to get the id of the container, we will need this for the next step.
docker ps -aqf "ancestor=cargr563/esri-exb:exb-1.8"

This will return the id of the container. Substitute the container id in the below and run the commands to copy the types in to your local development machine.
docker cp <containerId>:/home/node/ArcGISExperienceBuilder/client/jimu-arcgis ./volumes/widgets/live-weather/node_modules/@types
docker cp <containerId>:/home/node/ArcGISExperienceBuilder/client/jimu-core ./volumes/widgets/live-weather/node_modules/@types
docker cp <containerId>:/home/node/ArcGISExperienceBuilder/client/jimu-for-builder ./volumes/widgets/live-weather/node_modules/@types
docker cp <containerId>:/home/node/ArcGISExperienceBuilder/client/jimu-for-test ./volumes/widgets/live-weather/node_modules/@types
docker cp <containerId>:/home/node/ArcGISExperienceBuilder/client/jimu-icons ./volumes/widgets/live-weather/node_modules/@types
docker cp <containerId>:/home/node/ArcGISExperienceBuilder/client/jimu-layouts ./volumes/widgets/live-weather/node_modules/@types
docker cp <containerId>:/home/node/ArcGISExperienceBuilder/client/jimu-theme ./volumes/widgets/live-weather/node_modules/@types
docker cp <containerId>:/home/node/ArcGISExperienceBuilder/client/jimu-ui ./volumes/widgets/live-weather/node_modules/@types
4: Understanding the code
Inspect the code and comments to understand how we are wrapping the widget, to make this work you will need to create a free account at https://www.weatherapi.com/ and obtain use your API key in the widget initialisation.
If you would like to understand the code more, see the sample code from Esri here.
The final thing to do is create an application with the widget, or if you want to skip all that, then you can copy the below code into the public folder.
Ensuring it looks like the following.
5: The build pipeline
For us to create the build pipeline, the first thing we need to do is create some variables that we will use throughout the process.
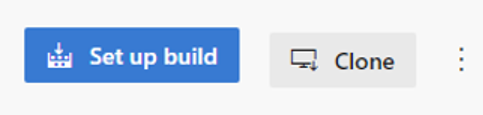
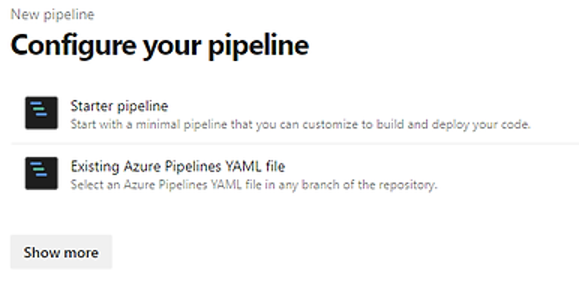
To get started, in the Experience Builder repository, click the button to set up the build.
This will open the pipeline editor, select Starter Pipeline from the options presented.
You will now see a starter pipeline with some hello world code.
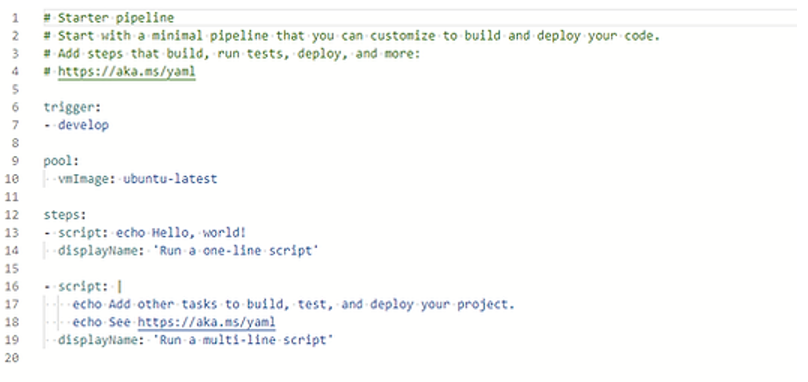
Remove all code from line 13 down.
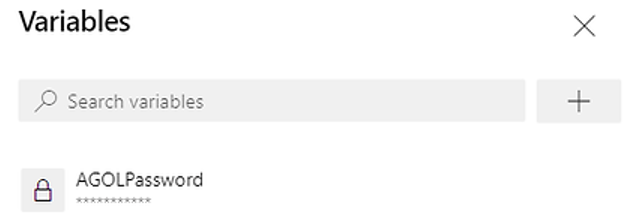
We now need to add in a pipeline variable, this will be a variable that is only available to the pipeline, eg it cannot be shared with any other pipeline like the ones created in a variable library. Click the Variables button to add a new variable.

In the page that appears, add a new variable called AGOLPassword and add your password to your ArcGIS Online account. Ensure you hit the padlock to keep the value secret.
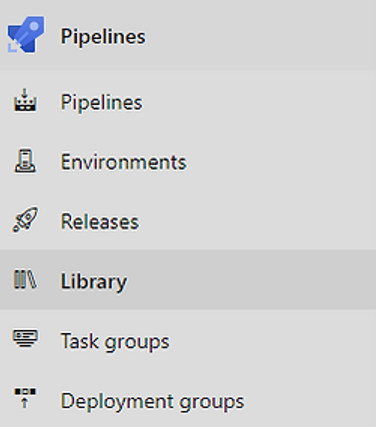
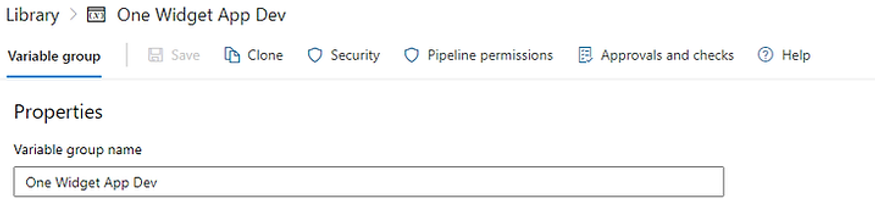
Next, click the Library section to add a new Variable Group.
Call the group One Widget App Dev.
Add a variable to the group called downloadCount and set its value to 0. There is no need to keep this value secret.
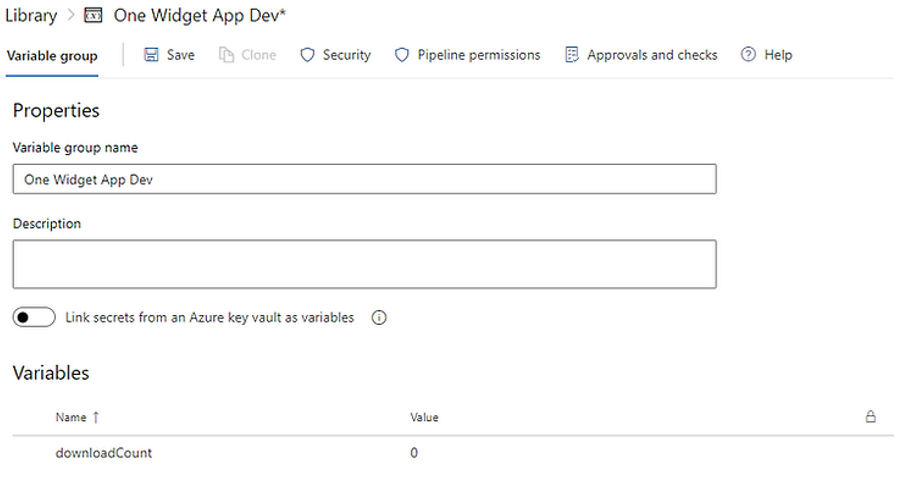
Take note of the variableGroupId in the address bar, we will need this when we are creating the build pipeline. In this instance, it is 6

With that done we can now go back to editing our pipeline.
The build pipeline for the Experience Builder application is somewhat complex; download the file below open it up and copy the contents into your azure-pipelines file.
Below is a detailed explanation of each step
At the top of the file, we declare the variables that we want to use within the pipeline. The first one we are pulling from a variable group, using the group identifier, and assigning it to a variable in the pipeline, this is a count of the number of times we have built the application, this is done as Experience Builder has a cache busting mechanism, and without it, we would need to ask users to clear their cache each time we made a release.
variables:
- group: One Widget App Dev
- name: cdnNo
value: $[variables.downloadCount]
The second variable is a system access token, we need this as we will be programmatically updating our variable library.
- name: SYSTEM_ACCESSTOKEN
value: $(System.AccessToken)
The second variable is the version we are targeting. By doing this we can make it simple to upgrade the version of Experience Builder.
- name: ExbVersion
value: 1.8
In the next step, we use the out-of-the-box tools from Esri to download Experience Builder into the pipeline, we need to supply the command line with a username and password, and we supply the password as the variable we created.
- task: CmdLine@2
displayName: Download Experience Builder
env:
ARCGIS_LIB_DOWNLOADER_USERNAME: gsc_eaglegis
ARCGIS_LIB_DOWNLOADER_PASSWORD: $(AGOLPassword)
inputs:
script: |
npx arcgis-lib-downloader -p arcgis-experience-builder -v $(ExbVersion)
Once Experience builder has been downloaded into the pipeline, we need to extract the files.
- task: CmdLine@2
displayName: Unzip Experience Builder
inputs:
script: |
unzip -q arcgis-experience-builder-$(ExbVersion).zip -d arcgis-experience-builder-$(ExbVersion)
In this step we copy the widgets that we have created out of our repository in to the pipeline.
- task: CmdLine@2
displayName: Copy widgets
inputs:
script: |
dir
cp -r volumes/widgets/* arcgis-experience-builder-$(ExbVersion)/ArcGISExperienceBuilder/client/your-extensions/widgets
As Experience Builder has never started, we need to create the app directory to hold our application.
- task: CmdLine@2
displayName: Create App Directory
inputs:
workingDirectory: arcgis-experience-builder-$(ExbVersion)/ArcGISExperienceBuilder/server
script: |
mkdir public && cd public && mkdir apps && cd apps
In this step we take the current download count and increment it in the download_times.json file. We use PowerShell to achieve this. Its important to note, that in the below, the assumption is that our application is in the 0 folder.
- task: PowerShell@2
displayName: Update the download times in JSON
inputs:
targetType: 'inline'
script: |
# Create the download count file and update the contents to our download count
$dwnCount = ($(cdnNo) -as [int]) + 1
Write-Output $dwnCount
Set-Content -Path volumes\public\apps\0\download-times.json -Value $dwnCount
Write-Output $(cdnNo)
After we have updated the download count, we need to go back to our variable library and update the count in there. Again, we need to use PowerShell to achieve this. This where we need to add id of the variable library. You can see this being used below after the reference to ..variablesgroups/6? We also need to ensure that the build process has the correct permissions to update the library.
- task: PowerShell@2
displayName: Update the download times in libraries
inputs:
targetType: 'inline'
script: |
$NewValue = ($(cdnNo) -as [int]) + 1
$VariableName = "downloadCount"
Write-Host "NewValue : $NewValue"
$url = "$($env:SYSTEM_TEAMFOUNDATIONCOLLECTIONURI)$env:SYSTEM_TEAMPROJECTID/_apis/distributedtask/variablegroups/6?api-version=6.0-preview.2"
Write-Output "$(SYSTEM_ACCESSTOKEN)"
Write-Host "URL: $url"
$authHeader = @{Authorization = "Bearer $(SYSTEM_ACCESSTOKEN)"}
$definition = Invoke-RestMethod -Uri $url -ContentType "application/json" -Headers $authHeader
Write-Output "$definition"
Write-Host "Pipeline = $($definition | ConvertTo-Json -Depth 100)"
$definition.variables.downloadCount.value = $NewValue
$definitionJson = $definition | ConvertTo-Json -Depth 100 -Compress
Write-Output "$definitionJson"
Invoke-RestMethod -Method Put -Uri $url -Headers $authHeader -ContentType "application/json" -Body ([System.Text.Encoding]::UTF8.GetBytes($definitionJson)) | Out-Null
Next, we copy our application from the repository into the app folder we created, so that we can create our application.
- task: CmdLine@2
displayName: Copy app directory
inputs:
script: |
dir
cp -r volumes/public/apps/* arcgis-experience-builder-$(ExbVersion)/ArcGISExperienceBuilder/server/public/apps
Next, we do the install for the client folder.
- task: CmdLine@2
displayName: NPM install client folder
inputs:
workingDirectory: arcgis-experience-builder-$(ExbVersion)/ArcGISExperienceBuilder/client
script: |
npm ci
Next, we install the dependancies for our custom widget.
- task: CmdLine@2
displayName: NPM install dependancies for custom widget
inputs:
workingDirectory: arcgis-experience-builder-$(ExbVersion)/ArcGISExperienceBuilder/client/your-extensions/widgets/live-weather
script: |
npm install
We do a check for updates to our custom widget.
- task: CmdLine@2
displayName: Update NPM custom widget
inputs:
workingDirectory: arcgis-experience-builder-$(ExbVersion)/ArcGISExperienceBuilder/client/your-extensions/widgets/live-weather
script: |
npm update @eaglegis/weather-widget
Finally for Experience Builder we install the server.
- task: CmdLine@2
displayName: NPM install server folder
inputs:
workingDirectory: arcgis-experience-builder-$(ExbVersion)/ArcGISExperienceBuilder/server
script: |
npm ci
With server installed, we can now call the build command to build our widgets in to the dist folder.
- task: CmdLine@2
displayName: Build widgets
inputs:
workingDirectory: arcgis-experience-builder-$(ExbVersion)/ArcGISExperienceBuilder/client
script: |
npm run build:dev
Next, we run the download script which compiles our application and puts all the required files into a single zip file.
- task: CmdLine@2
displayName: Run download script
inputs:
workingDirectory: arcgis-experience-builder-$(ExbVersion)/ArcGISExperienceBuilder
script: |
node -e "require('./server/src/middlewares/dev/apps/app-download.js').zipApp('0', 'app.zip')"
We then unzip that file, as we will need to access the internal files later in our release pipeline.
- task: CmdLine@2
displayName: Unzip Experience Builder
inputs:
workingDirectory: arcgis-experience-builder-$(ExbVersion)/ArcGISExperienceBuilder
script: |
unzip -q app.zip -d app
chmod -R 777 app
We copy the application to our staging directory.
- task: CopyFiles@2
inputs:
SourceFolder: 'arcgis-experience-builder-$(ExbVersion)/ArcGISExperienceBuilder/app'
Contents: '**'
TargetFolder: '$(Build.ArtifactStagingDirectory)/$(Build.BuildId)'
CleanTargetFolder: true
OverWrite: true
Finally, publish the application to the aritfact directory to make it available to the rest of DevOps.
- task: PublishBuildArtifacts@1
inputs:
PathtoPublish: '$(Build.ArtifactStagingDirectory)/$(Build.BuildId)'
ArtifactName: 'exb-app-deploy'
publishLocation: 'Container'
6: Create Release Pipeline
The last step is to take the artifact we have created and publish this to the internet. Below we will publish to an Azure App Service, but you can publish to a container, a static website, or anything you would like.
To complete, this you should already have an Azure account and have created an Azure App Service within that account.
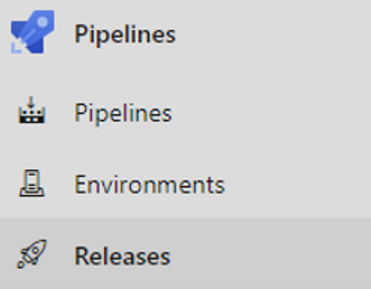
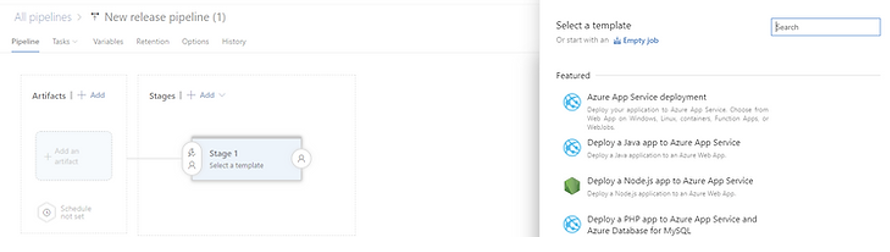
Go to the Releases section.
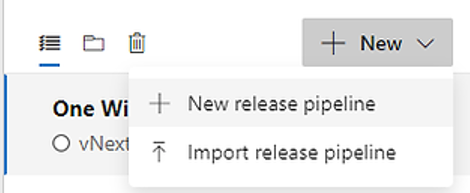
Add a new release.
Select the Azure App Service Deployment template.
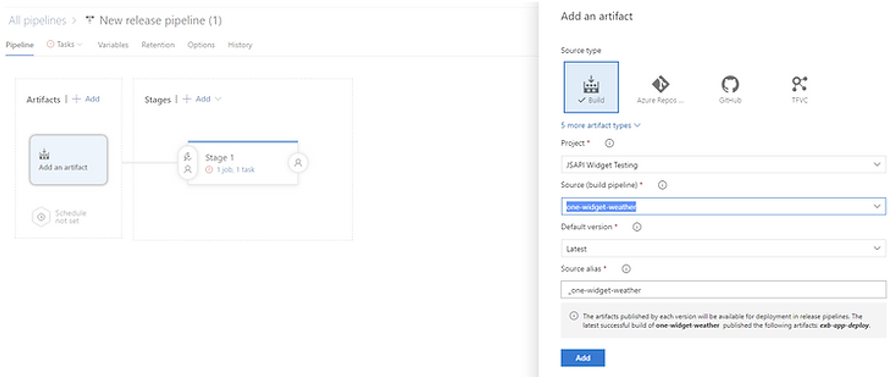
In the Artifacts window, add the artifact from the build pipeline.
Set up the continuous deployment trigger by clicking the lightning bolt.
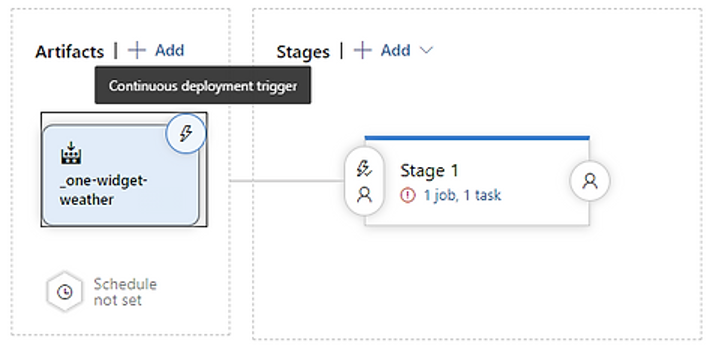
Configure the trigger as follows.

Next, open the Stage.

With Stage 1 selected, configure it as follows.
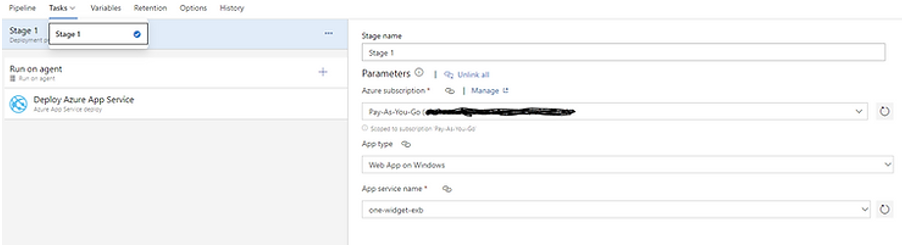
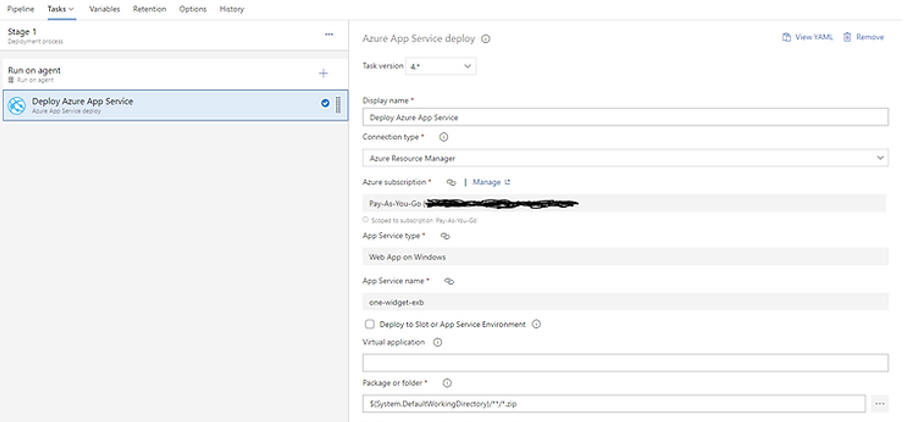
Next, click on the Deploy Azure App Service task, and configure as per below, substituting in your own values.
And that is it! If you want to add in pre-deployment approvals, then you can do that at the overview page of the release pipeline.
This release pipeline is quite basic, in a future post, I will show how you can create a pipeline for a secure app working against multiple different environments, Dev, Test, PreProd and Production, substituting in variables for each environment.
An example of the resulting app from the above can be viewed here
View all blog posts